Custom UI Tutorial
Objective: learn the basics of the Apache Airavata Django Portal and how to make both simple and complex customizations to the user interface.
Prerequisites
Tutorial attendees should have:
- a text editor or IDE for writing Python and web code. Any text editor or IDE will do but if you're looking for recommendations, I recommend Visual Studio Code.
- Python (3.6 - 3.10)
- Git client
- Docker Desktop
- If you don't have Docker installed or can't install it, you'll also need:
Installing Python
Python 3.6-3.10 are supported, but I highly recommend you download and use Python 3.10
Download and install Python 3.10.
- (macOS/Windows): Download from https://www.python.org/downloads/
- (Linux): use your distribution's package manager to install Python 3.10
Verify you have installed Python 3.10:
$ python3.10 --version
Python 3.10.0
Open PowerShell then run:
PS C:\Users\username> py --version
Python 3.10.0
Installing Git
If you don't already have Git installed, see https://git-scm.com/downloads and follow the installation instructions for your platform.
Verify that you have installed Git:
Open a terminal
$ git --version
git version 2.26.0
The command should print "git version X.X". The version should be at least 2.0.
Open PowerShell then run:
PS C:\Users\username> git --version
git version 2.32.0.windows.2
The command should print "git version X.X". The version should be at least 2.0.
Installing Docker Desktop
Follow the instructions at Docker Desktop to install Docker Desktop.
Verify that you have installed Docker Desktop:
Open a terminal
$ docker --version
Docker version 20.10.7, build f0df350
$ docker run hello-world
Unable to find image 'hello-world:latest' locally
latest: Pulling from library/hello-world
109db8fad215: Pull complete
Digest: sha256:df5f5184104426b65967e016ff2ac0bfcd44ad7899ca3bbcf8e44e4461491a9e
Status: Downloaded newer image for hello-world:latest

Hello from Docker!
This message shows that your installation appears to be working correctly.
...
The command should print "Docker version X.X". As long as it is a recent version, you should be fine.
Open PowerShell then run:
PS C:\Users\username> docker --version
Docker version 20.10.7, build f0df350
PS C:\Users\username> docker run hello-world
Unable to find image 'hello-world:latest' locally
latest: Pulling from library/hello-world
b8dfde127a29: Pull complete
Digest: sha256:df5f5184104426b65967e016ff2ac0bfcd44ad7899ca3bbcf8e44e4461491a9e
Status: Downloaded newer image for hello-world:latest

Hello from Docker!
This message shows that your installation appears to be working correctly.
...
The command should print "Docker version X.X". As long as it is a recent version, you should be fine.
Installing Node.js LTS
Note: you only need to install Node.js LTS if you don't have Docker installed.
Follow the instructions on the Node.js downloads page to install Node.js LTS for your platform.
Verify that you have installed Node.js LTS:
Open a terminal
$ node --version
v14.17.1
The command should print "vX.X". The version should be at least v14.0.
Open PowerShell then run:
PS C:\Users\username> node --version
v14.17.3
The command should print "vX.X". The version should be at least v14.0.
Installing Yarn
Note: you only need to install Yarn if you don't have Docker installed. Yarn requires Node.js.
To install Yarn run
npm install -g yarn
Verify that you have installed Yarn:
Open a terminal
$ yarn --version
1.22.10
The command should print "X.X". The version should be 1.X.
Open PowerShell then run:
PS C:\Users\username> yarn --version
1.22.10
The command should print "X.X". The version should be 1.X.
Outline
- Introduction
- Presentation: Overview of Airavata and Django Portal
- History of the Airavata UI and how did we get here
- Hands on: run a basic computational experiment in the Django portal
- Tutorial exercise: customize the input user interface for an application
- Tutorial exercise: Create a custom output viewer for an output file
- Tutorial exercise: Create a custom Django app
- use the
AiravataAPIJavaScript library for utilizing the backend Airavata API - develop a simple custom user interface for setting up and visualizing computational experiments
- use the
Hands on: run a Gaussian computational experiment in the Django portal
Log into testdrive.airavata.org
First, you'll need a user account. For the in person tutorial we'll have a set of pre-created usernames and passwords to use. If you are unable to attend the in person tutorial or would otherwise like to create your own account, go to the Create Account page and select Sign in with existing institution credentials. This will take you to the CILogon institution selection page. If you don't find your institution listed here, go back to the Create Account page and fill out the form to create an account with a username, password, etc.
Once you have an account, log into the Airavata Testdrive portal.
After you've logged in, an administrator can grant you access to run the Gaussian application. During the tutorial we'll grant you access right away and let you know. If you're at the in person tutorial and using a pre-created username and password, you should already have all of the necessary authorizations.
When you log in for the first time you will see a list of applications that are available in this science gateway. Applications that you are not able to run are greyed out but the other ones you can run. Once you are granted access, refresh the page and you should now see that you the Gaussian16 application is not greyed out.
Submit a test job
From the dashboard, click on the Gaussian16 application. The page title is Create a New Experiment.
Here you can change the Experiment Name, add a description or select a different project if you have multiple projects.
We'll focus on the Application Inputs for this hands-on. The Gaussian application requires one input, an Input-File. The following is a preconfigured Gaussian input file. Download this to your local computer and then click the Browse button to upload the file:
You can click on the file to take a quick look at the file in a popup window.
Now we'll select what account to charge and where to run this job. The Allocation field should already have Default selected. Under Compute Resource make sure you select Expanse.
Then click Save and Launch.
You should then be taken to the Experiment Summary page which will update as
the job progresses. When the job finishes you'll be able to download the .log
file which is the primary output file of the gaussian application.
We'll come back to this experiment later in the tutorial.
Tutorial exercise: customize the input user interface for an application
For this exercise we'll define an application based on the Computational Systems Biology Group's eFindSite drug-binding site detection software. We'll use this application to demonstrate how to customize the user interface used for application inputs.
Basic application configuration
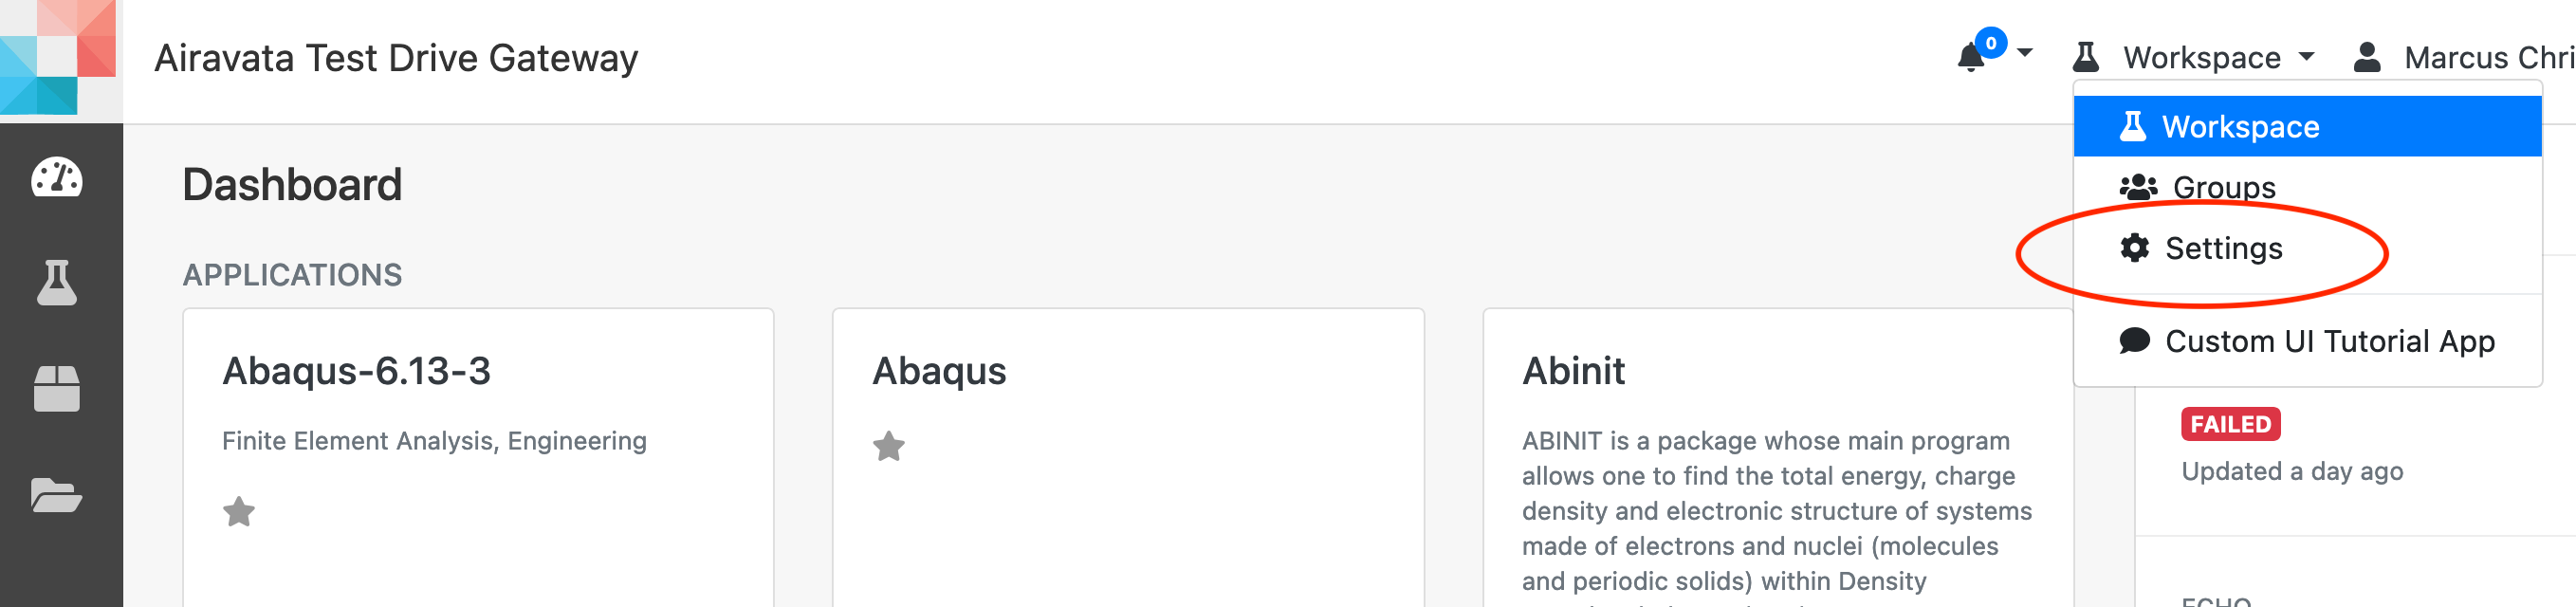
- In the portal, click on the dropdown menu at the top right (currently Workspace is likely selected) and select Settings.
- You should see the Application Catalog. Click on the New Application button.
- For Application Name provide
eFindSite-<your username>. Appending your username will allow you to distinguish your version of eFindSite from other users. - Click Save.
- Click on the Interface tab.
- This application has 4 command line inputs. We'll add them now. To add the
first one, click on Add application input and provide the following
information:
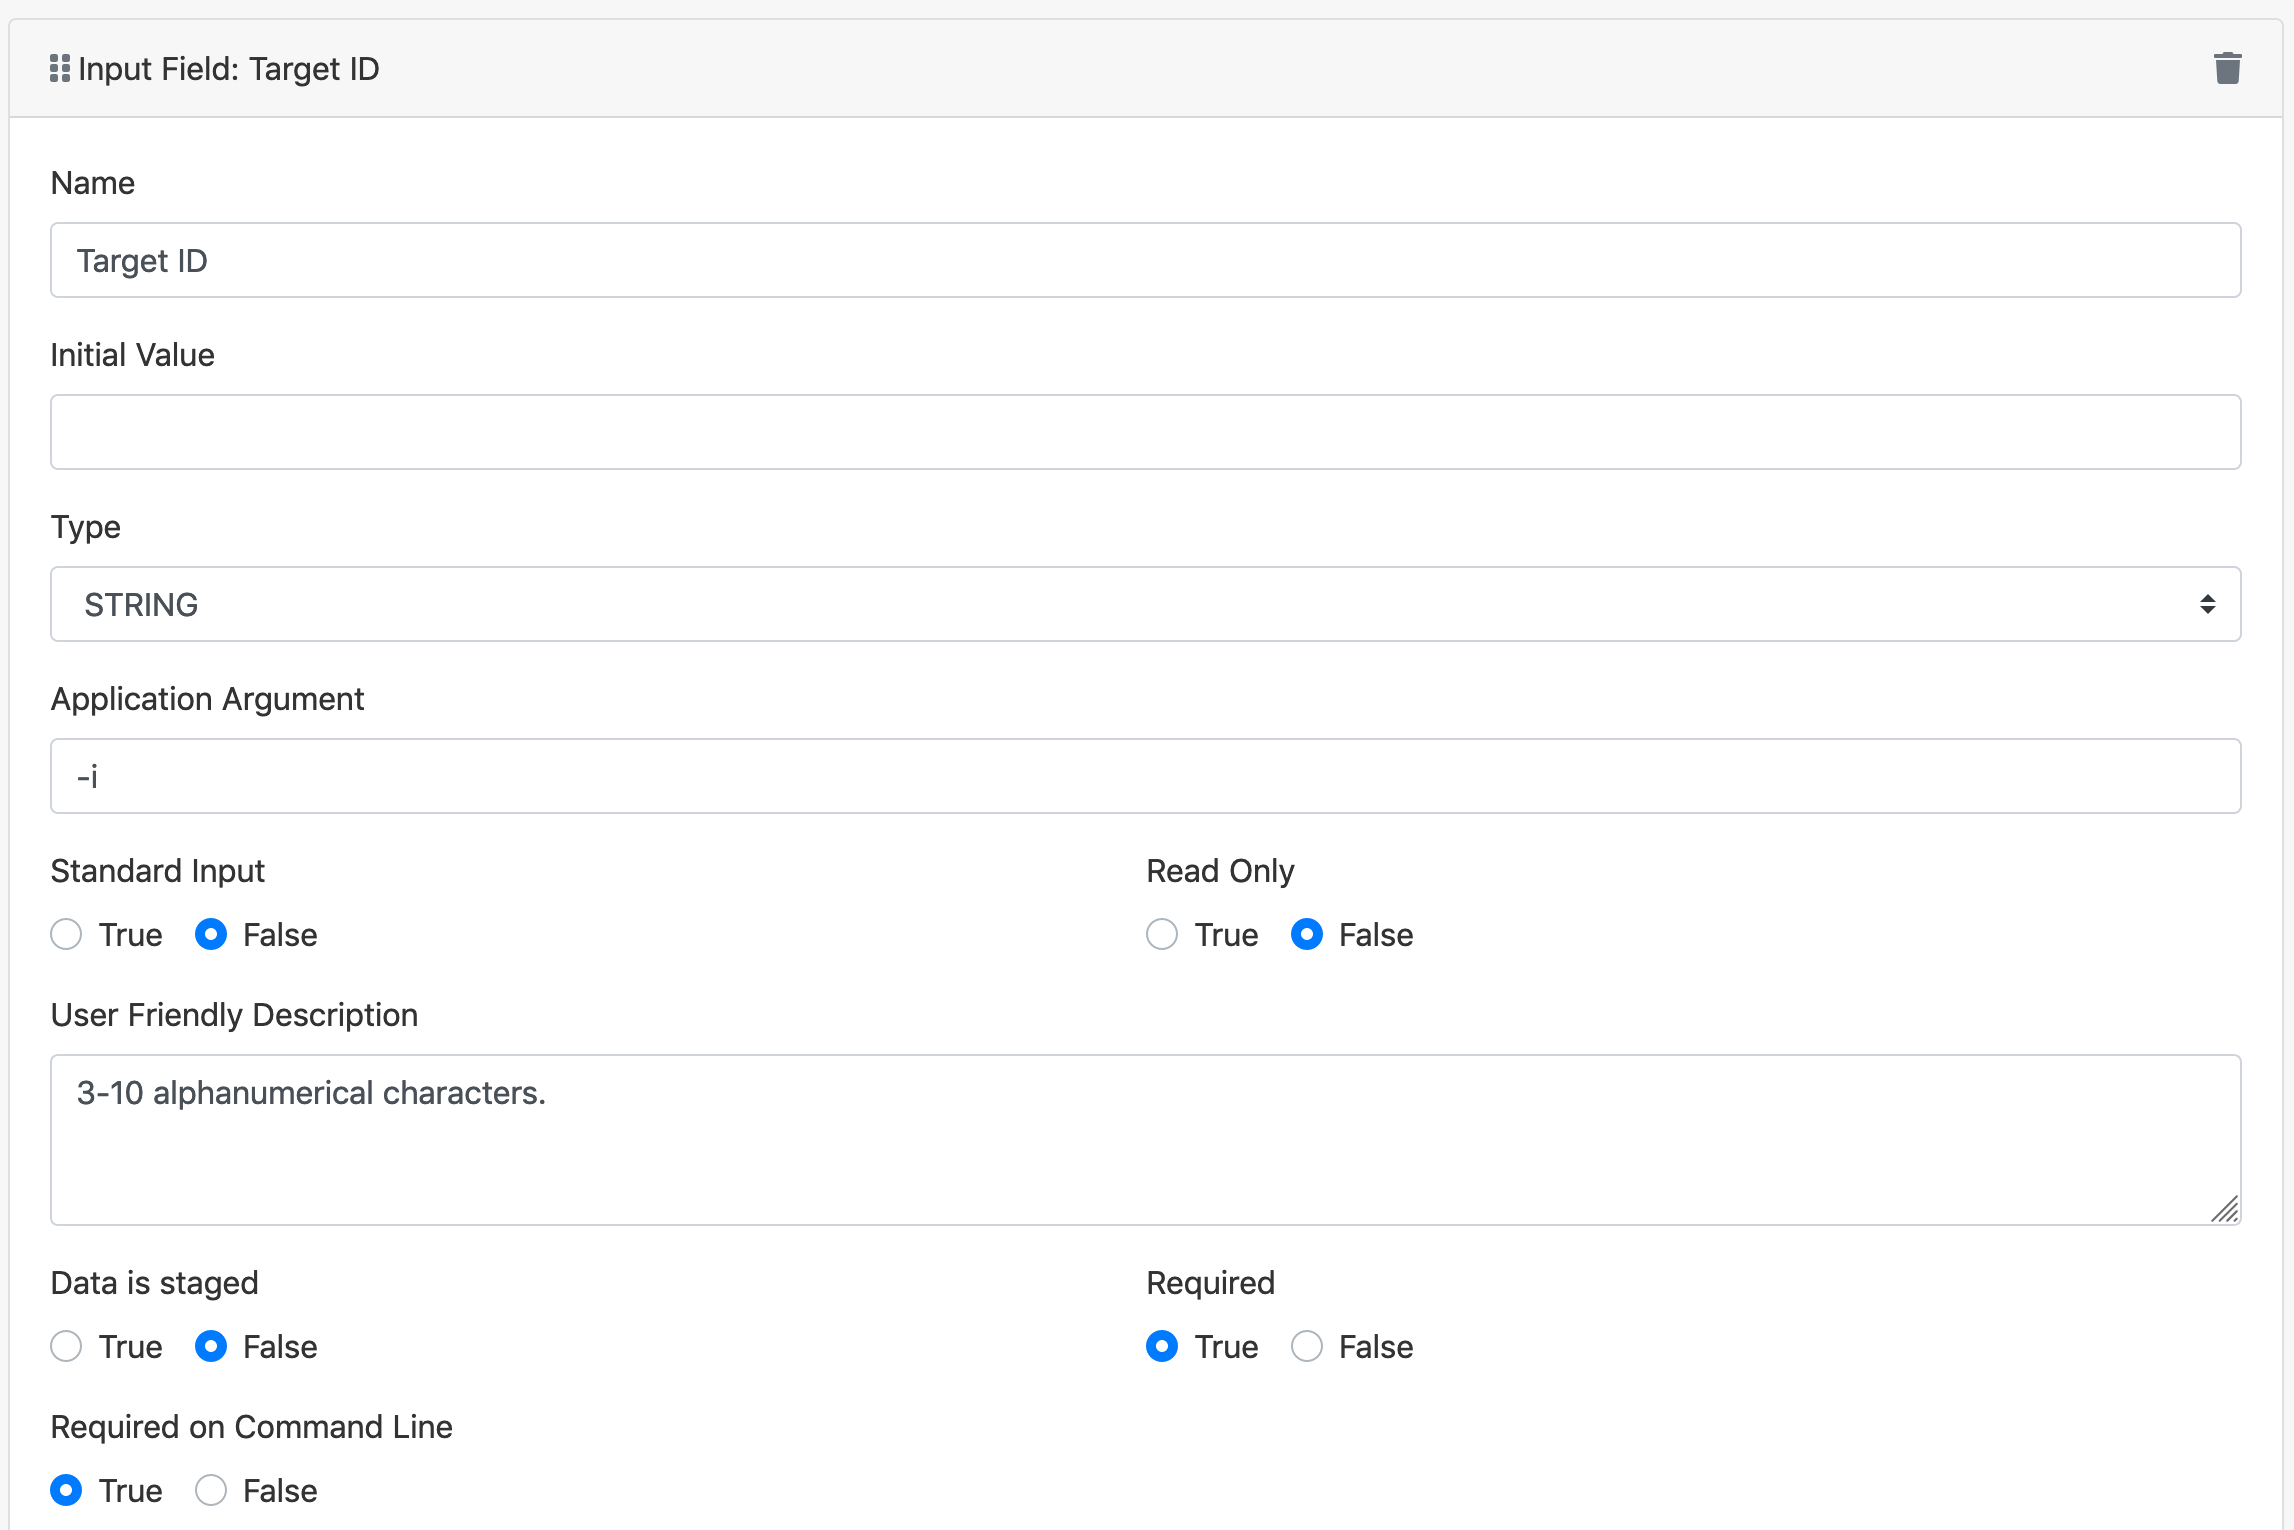
- Name:
Target ID - Type: STRING (which is the default)
- Application Argument:
-i - User Friendly Description:
3-10 alphanumerical characters. - Required:
True - Required on Command Line:
True
- Name:
- Add the next three application inputs in the same way, using the values in the table below:
| Name | Type | Application Argument | Required | Required on Command Line |
|---|---|---|---|---|
| Target Structure | URI | -s |
True | True |
| Screening libraries | STRING | -l |
False | True |
| Visualization scripts | STRING | -v |
False | True |
(In Airavata, files are represented as URIs. When an application input has type URI it means that a file is needed for that input. From a UI point of view, this essentially means that the user will be able to upload a file for inputs of type URI.)
Normally we would also define the output files for this application, but for this exercise we are only interested in exploring the options available in customizing the application inputs and we won't actually run this application. We need to register a deployment to be able to invoke this application. An application deployment includes the details of how and where an application is installed on a compute resource. Since we won't actually run this application, we'll just create a dummy deployment so that we can invoke it from the Workspace Dashboard.
- Click Save at the bottom of the screen.
- Click on the Deployments tab.
- Click on the New Deployment button. Select the example-vc.jetstream-cloud.org compute resource in the drop down list and click OK.
- For the Application Executable Path, provide the value
/usr/bin/true. This is the only required field. - Click Save at the bottom of the screen.
- Use the top level menu to go back to the Workspace. You should see your eFindSite application listed there.
- Click on your eFindSite application.
If you see a form with the inputs that we registered for the application (Target ID, etc.) then you have successfully registered the application interface.
Improving the application input user interface
There are a few things to point out now:
- the Target ID input takes a string value, but only certain characters (alphanumeric) are allowed and the string value has a minimum and maximum allowed length.
- the Screening libraries and Visualization scripts only accept specific
values. For example, one of the allowed values for Screening libraries is
screen_drugbank
We can make this user interface more user friendly by providing more guidance in the application inputs' user interface. What we'll do:
- for Target ID (input #1) we'll provide validation feedback that verifies that the given value has an allowed length and only allowed characters.
- nothing to configure for Target Structure (input #2)
- for Screening libraries and Visualization scripts (inputs #3 and #4) we'll provide a list of labeled checkboxes for the user to select.
- Go back to Settings and in the Application Catalog click on your eFindSite application.
- Click on the Interface tab.
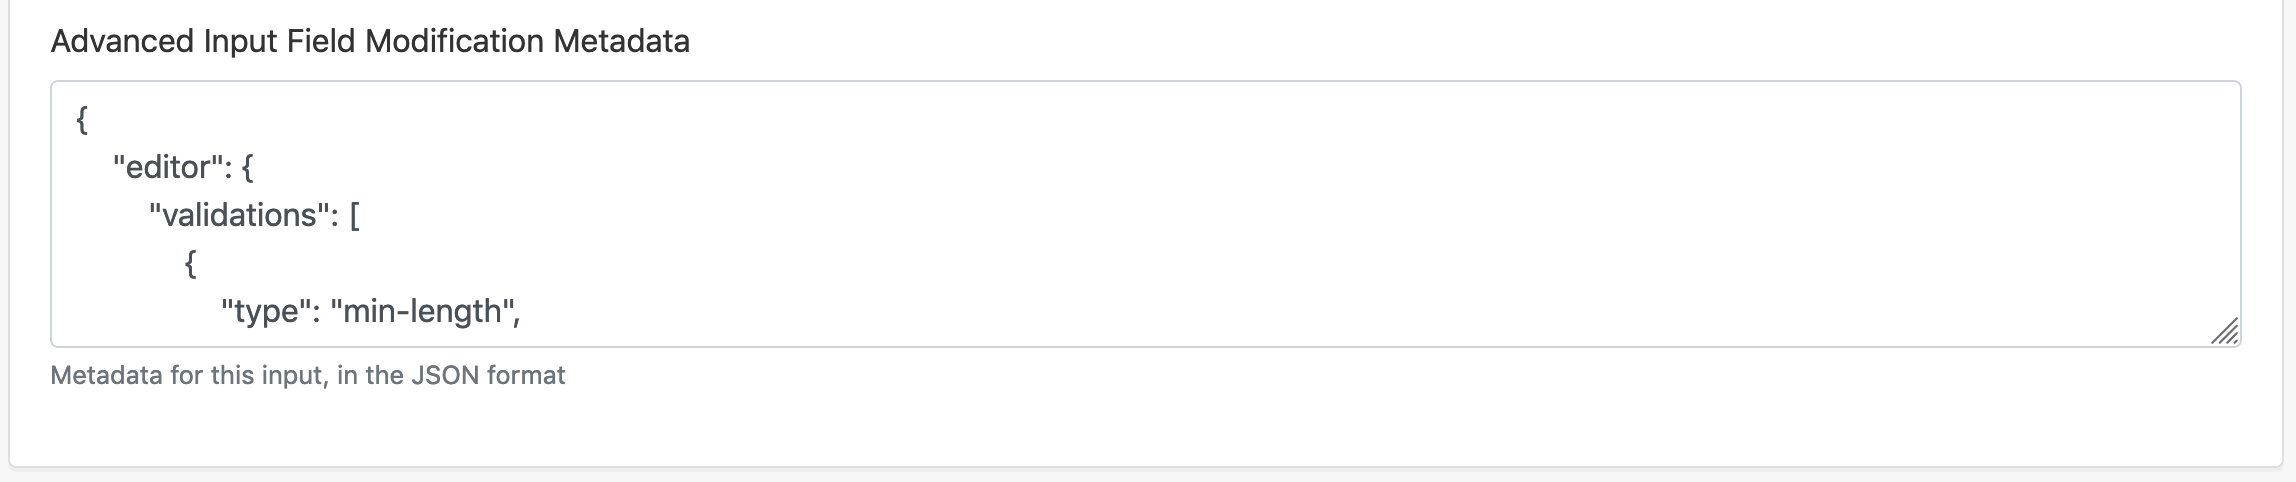
- For Target ID (input #1), in the Advanced Input Field Modification Metadata box, add the following JSON configuration:
{
    "editor": {
        "validations": [
            {
                "type": "min-length",
                "value": 3
            },
            {
                "type": "max-length",
                "value": 10
            },
            {
                "message": "Target ID may only contain alphanumeric characters and underscores.",
                "type": "regex",
                "value": "^[a-zA-Z0-9_]+$"
            }
        ],
        "ui-component-id": "string-input-editor"
    }
}
It should look something like this:
This JSON configuration customizes the input editor in two ways:
- it adds 3 validations: min-length, max-length and a regex
- it sets the UI component of the input editor to be the
string-input-editor(which is also the default)
- Skipping past Target Structure (input #2) and on to Screening Libraries (input #3), set the Advanced Input Field Modification Metadata to:
{
    "editor": {
        "ui-component-id": "checkbox-input-editor",
        "config": {
            "options": [
                {
                    "text": "BindingDB",
                    "value": "screen_bindingdb"
                },
                {
                    "text": "ChEMBL (non-redundant, TC<0.8)",
                    "value": "screen_chembl_nr"
                },
                {
                    "text": "DrugBank",
                    "value": "screen_drugbank"
                },
                {
                    "text": "KEGG Compound",
                    "value": "screen_keggcomp"
                },
                {
                    "text": "KEGG Drug",
                    "value": "screen_keggdrug"
                },
                {
                    "text": "NCI-Open",
                    "value": "screen_nciopen"
                },
                {
                    "text": "RCSB PDB",
                    "value": "screen_rcsbpdb"
                },
                {
                    "text": "ZINC12 (non-redundant, TC<0.7)",
                    "value": "screen_zinc12_nr"
                }
            ]
        }
    }
}
This JSON configuration specifies a different UI component to use as the input
editor, the checkbox-input-editor. It also provides a list of text/value pairs
for the checkboxes; the values are what will be provided to the application as
command line arguments.
- Similarly for the Visualization scripts (input #4), provide the following JSON configuration:
{
    "editor": {
        "ui-component-id": "checkbox-input-editor",
        "config": {
            "options": [
                {
                    "text": "VMD",
                    "value": "visual_vmd"
                },
                {
                    "text": "PyMOL",
                    "value": "visual_pymol"
                },
                {
                    "text": "ChimeraX",
                    "value": "visual_chimerax"
                }
            ]
        }
    }
}
- Click Save at the bottom of the page.
- Now, go back to the Workspace and on the Dashboard click on your eFindSite application. The application inputs form should now reflect your changes.
- Try typing an invalid character (for example,
#) in Target ID. Also try typing in more than 10 alphanumeric characters. When an invalid value is provided the validation feedback informs the user of the problem so that the user can correct it.

Additional application input customizations
Other UI components are available:
- textarea
- radio buttons
- dropdown
We're working to provide a way for custom input editors to be added by the community, especially domain specific input editors. For example, a ball and stick molecule editor or a map view for selecting a bounding box of a region of interest.
Also you can define dependencies between application inputs and show or hide inputs based on the values of other inputs.
Tutorial exercise: Create a custom output viewer for an output file
By default, the Django portal provides a very simple view for output files that allows users to download the file to their local machine. However, it is possible to provide additional custom views for output files. Examples include:
- image (visualization)
- link (perhaps to another web application that can visualize the file)
- chart
- parameterized notebook
To be able to create a custom output viewer we'll need to write some Python code. First we'll generate the custom Django app code.
Generate a custom Django app
We have a local develop environment created. Now we can start adding custom code. First, we'll create a custom Django app, which is the standard way to package a Django extension. We won't write any Django code until the next exercise, but generating the custom Django app code gives us a Python package we can install in which we can write the custom output view code.
Create and activate a Python virtual environment
$ cd $HOME
$ python -m venv tutorial-env
$ source tutorial-env/bin/activate
(tutorial-env) $
PS C:\Users\username> cd $HOME
PS C:\Users\username> py -m venv tutorial-env
PS C:\Users\username> .\tutorial-env\Scripts\Activate.ps1
(tutorial-env) PS C:\Users\username>
Run the django app cookiecutter
- Install the latest version of cookiecutter. Cookiecutter is a tool for generating project source code from a template.
pip install -U cookiecutter
- Use cookiecutter to run the Airavata Django app template.
cookiecutter https://github.com/apache/airavata-cookiecutter-django-app.git
You'll need to answer some questions. You can name it whatever you want, but to
follow along with the tutorial, for project_name give Custom UI Tutorial
App. For the rest of the questions, you can simply accept the defaults:
project_name [My Custom Django App]: Custom UI Tutorial App
project_slug [custom_ui_tutorial_app]:
project_short_description [Custom Django app with everything needed to be installed in the airavata-django-portal]:
app_config_class_name [CustomUiTutorialAppConfig]:
version [0.1.0]:
Setup local Django portal development environment
For running the local Django portal development environment, there are a few options:
- Docker: Run the portal as a Docker container. If you have Docker installed, this is the recommended option for the tutorial.
- Python: Install the portal dependencies (Python and Nodejs) and then run it directly on your computer. This is recommended when you don't or can't have Docker installed. It is also what we recommend when you are developing a real custom django app extension.
Regardless of which approach you use, you'll need to get a config file for
setting up a local development environment that has the same settings as
Testdrive. Go to https://testdrive.airavata.org/admin/developers/ and download
the settings_local.py file for local development. Move or copy it to the
$HOME/custom_ui_tutorial_app/ directory.
Note for Windows users, the following commands assume PowerShell.
- Make sure you have Docker installed.
-
Run the following to create a Docker container called custom-ui-tutorial.
cd $HOME/custom_ui_tutorial_app docker run --pull always -d --name custom-ui-tutorial -p 8000:8000 -v "${PWD}:/extensions" -v "${PWD}/settings_local.py:/code/django_airavata/settings_local.py" apache/airavata-django-portal -
Wait until the Docker container starts up. Go to http://localhost:8000 and when it loads and you see Welcome to your new Wagtail site!, then you're ready to proceed to the next step.
-
Run the following to load the default set of CMS pages:
docker exec custom-ui-tutorial python manage.py load_cms_data new_default_theme
Go to http://localhost:8000, click on Login in, enter your username and password. On the dashboard you should see the your experiments listed on the right hand side.
Verify that you have the following installed
- Python 3.10
- Node LTS
- Yarn
- Git
The following instructions assume that you start in your home directory, but you could technically checkout and build the code anywhere.
-
Make sure that you have activated your
tutorial-envvirtual environment. You should see(tutorial-env)at the beginning of the CMD prompt. See the virtual environment instructions if needed. -
Clone the custom_ui_tutorial_app and airavata-django-portal repositories.
(tutorial-env) PS C:\Users\username>cd $HOME (tutorial-env) PS C:\Users\username>git clone https://github.com/apache/airavata-django-portal.git -
Install the airavata-django-portal dependencies.
(tutorial-env) PS C:\Users\username>cd airavata-django-portal (tutorial-env) PS C:\Users\username\airavata-django-portal>pip install -U pip (tutorial-env) PS C:\Users\username\airavata-django-portal>pip install -r requirements.txt -
Copy in the settings_local.py file.
(tutorial-env) PS C:\Users\username\airavata-django-portal>copy ..\custom_ui_tutorial_app\settings_local.py django_airavata\ -
Run Django database migrations
(tutorial-env) PS C:\Users\username\airavata-django-portal>python manage.py migrate -
Load the default Wagtail CMS pages.
(tutorial-env) PS C:\Users\username\airavata-django-portal>python manage.py load_cms_data new_default_theme -
Build the JavaScript frontend code.
(tutorial-env) PS C:\Users\username\airavata-django-portal>.\build_js.bat
This last step can take a few minutes to complete.
Verify that you have the following installed
- Python 3.10
- Node LTS
- Yarn
- Git
The following instructions assume that you start in your home directory, but you could technically checkout and build the code anywhere.
-
Make sure that you have activated your
tutorial-envvirtual environment. You should see(tutorial-env)at the beginning of the shell prompt. See the virtual environment instructions if needed. -
Clone the custom_ui_tutorial_app and airavata-django-portal repositories.
(tutorial-env) $ cd $HOME (tutorial-env) $ git clone https://github.com/apache/airavata-django-portal.git -
Install the airavata-django-portal dependencies.
(tutorial-env) $ cd airavata-django-portal (tutorial-env) $ pip install -U pip (tutorial-env) $ pip install -r requirements.txt -
Copy in the settings_local.py file.
(tutorial-env) $ cp ../custom_ui_tutorial_app/settings_local.py django_airavata/ -
Run Django database migrations
(tutorial-env) $ python manage.py migrate -
Load the default Wagtail CMS pages.
(tutorial-env) $ python manage.py load_cms_data new_default_theme -
Build the JavaScript frontend code.
(tutorial-env) $ ./build_js.sh
This last step can take a few minutes to complete.
Create the custom output viewer
Now we'll also generate and implement a Gaussian Eigenvalues View provider.
- We'll run another cookiecutter template to generate the output view provider
code. First, change into the
custom_ui_tutorial_appgenerated in the previous step:
(tutorial-env) $ cd $HOME/custom_ui_tutorial_app
(tutorial-env) PS C:\Users\username>cd $HOME\custom_ui_tutorial_app
- Run the following cookiecutter template:
cookiecutter https://github.com/apache/airavata-cookiecutter-django-output-view.git -f
You'll need to answer some questions again. For project_name give Gaussian
Eigenvalues View. For custom_django_app_module_name, you need to provide the
name of the Python module that was generated by
cookiecutter-airavata-django-app, which for this tutorial is
custom_ui_tutorial_app. For all of the other questions you can accept the
default.
project_name [My Custom Output View]: Gaussian Eigenvalues View
project_slug [gaussian_eigenvalues_view]:
project_short_description [Gaussian Eigenvalues View generates data for an output view in the Airavata Django Portal]:
output_view_provider_class_name [GaussianEigenvaluesViewProvider]:
custom_django_app_module_name []: custom_ui_tutorial_app
output_views_directory_name [output_views]:
Select output_view_display_type:
1 - image
2 - link
3 - html
Choose from 1, 2, 3 [1]:
Select number_of_output_files:
1 - single (URI)
2 - multiple (URI_COLLECTION)
Choose from 1, 2 [1]:
-
This creates a custom output view provider, called GaussianEigenvaluesViewProvider, in
custom_ui_tutorial_app/output_views/. Open$HOME/custom_ui_tutorial_app/custom_ui_tutorial_app/output_views/gaussian_eigenvalues_view.pyin your editor and we'll look at the generated code. The cookiecutter template has generated a GaussianEigenvaluesViewProvider class with a method calledgenerate_data. The generate_data method has some commented out code samples and links to further information. There is also guidance at the end for how to prepare the values expected in the returned dictionary. Let's start filling in the implementation. -
As a final result, the output_views/gaussian_eigenvalues_view.py file should have the following contents. I'll explain each part of this in the following steps, but you can go ahead and copy and paste the following into
gaussian_eigenvalues_view.py:
import io
import os
import numpy as np from cclib.parser import ccopen from django.conf import
settings from matplotlib.figure import Figure
from airavata_django_portal_sdk import user_storage
class GaussianEigenvaluesViewProvider: display_type = 'image' name = "Gaussian
Eigenvalues"
def generate_data(self, request, experiment_output, experiment, output_file=None, **kwargs):
# Parse output_file
output_text = io.TextIOWrapper(output_file)
gaussian = ccopen(output_text)
data = gaussian.parse()
data.listify()
homo_eigenvalues = None
lumo_eigenvalues = None
if hasattr(data, 'homos') and hasattr(data, 'moenergies'):
homos = data.homos[0] + 1
moenergies = data.moenergies[0]
if homos > 9 and len(moenergies) >= homos:
homo_eigenvalues = [data.moenergies[0][homos - 1 - i] for i in range(1, 10)]
if homos + 9 <= len(moenergies):
lumo_eigenvalues = [data.moenergies[0][homos + i] for i in range(1, 10)]
# Create plot
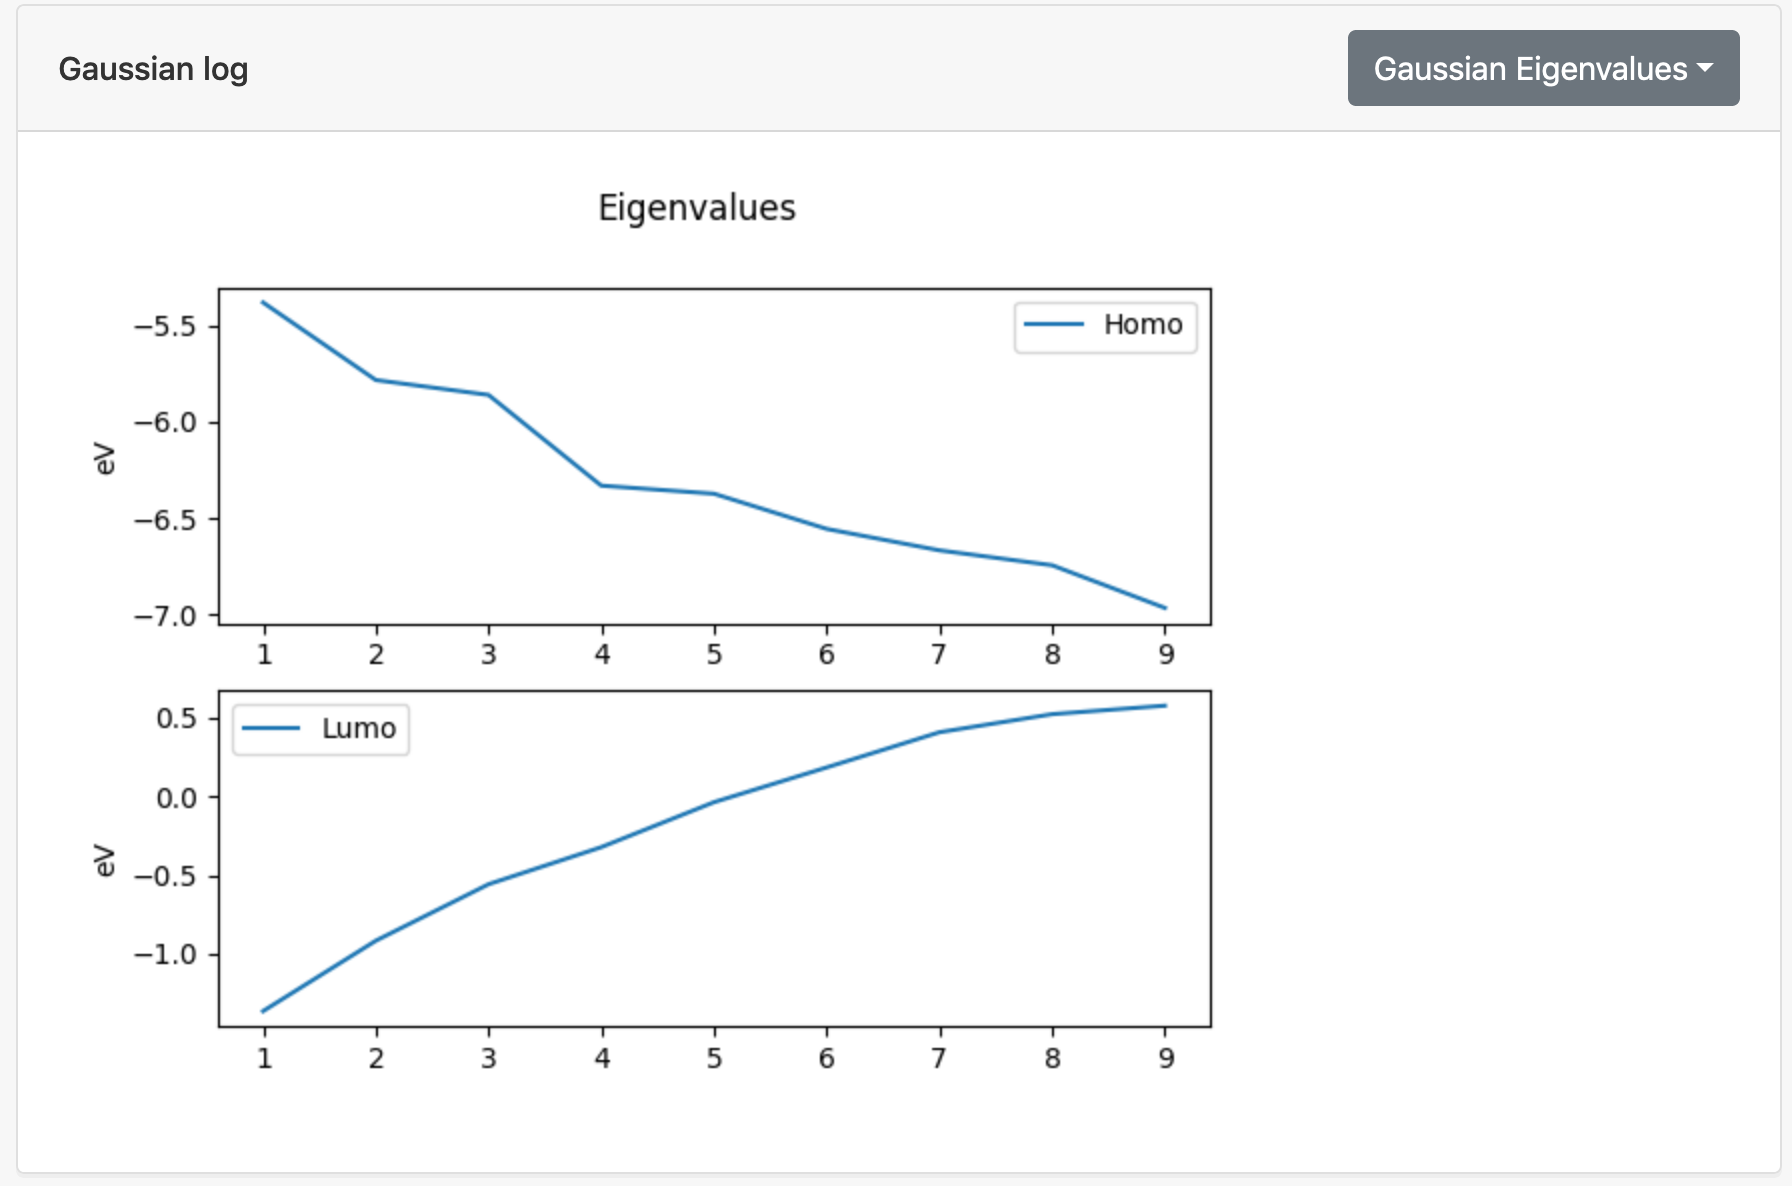
fig = Figure()
if homo_eigenvalues and lumo_eigenvalues:
fig.suptitle("Eigenvalues")
ax = fig.subplots(2, 1)
ax[0].plot(range(1, 10), homo_eigenvalues, label='Homo')
ax[0].set_ylabel('eV')
ax[0].legend()
ax[1].plot(range(1, 10), lumo_eigenvalues, label='Lumo')
ax[1].set_ylabel('eV')
ax[1].legend()
else:
ax = fig.subplots()
ax.text(0.5, 0.5, "No applicable data", horizontalalignment='center',
verticalalignment='center', transform=ax.transAxes)
# Export plot as image buffer
buffer = io.BytesIO()
fig.savefig(buffer, format='png')
image_bytes = buffer.getvalue()
buffer.close()
# return dictionary with image data
return {
'image': image_bytes,
'mime-type': 'image/png'
}
- Let's take a look at the implementation. First we added some imports at the top:
import io
import os

import numpy as np
from cclib.parser import ccopen
from django.conf import settings
from matplotlib.figure import Figure

from airavata_django_portal_sdk import user_storage
-
Next we implemented the
generate_datafunction. This function should return a dictionary with values that are expected for thisdisplay_type. For a display type of image, the required return values are image which should be a bytes array or file-like object with the image bytes and mime-type which should be the image's mime type. There implementation plots the eigenvalues of molecular orbital energies calculated by Gaussian and has three parts:- Use the cclib library to parse the Gaussian log file. cclib is a Python computational chemistry library which is used to read the molecular orbital energies.
- Generate a plot using matplotlib.
- Save the plot as a PNG image into an in-memory array of bytes.
Here's the
generate_datafunction:
    def generate_data(self, request, experiment_output, experiment, output_file=None, **kwargs):
        # Parse output_file
        output_text = io.TextIOWrapper(output_file)
        gaussian = ccopen(output_text)
        data = gaussian.parse()
        data.listify()
        homo_eigenvalues = None
        lumo_eigenvalues = None
        if hasattr(data, 'homos') and hasattr(data, 'moenergies'):
            homos = data.homos[0] + 1
            moenergies = data.moenergies[0]
            if homos > 9 and len(moenergies) >= homos:
                homo_eigenvalues = [data.moenergies[0][homos - 1 - i] for i in range(1, 10)]
            if homos + 9 <= len(moenergies):
                lumo_eigenvalues = [data.moenergies[0][homos + i] for i in range(1, 10)]

        # Create plot
        fig = Figure()
        if homo_eigenvalues and lumo_eigenvalues:
            fig.suptitle("Eigenvalues")
            ax = fig.subplots(2, 1)
            ax[0].plot(range(1, 10), homo_eigenvalues, label='Homo')
            ax[0].set_ylabel('eV')
            ax[0].legend()
            ax[1].plot(range(1, 10), lumo_eigenvalues, label='Lumo')
            ax[1].set_ylabel('eV')
            ax[1].legend()
        else:
            ax = fig.subplots()
            ax.text(0.5, 0.5, "No applicable data", horizontalalignment='center',
                verticalalignment='center', transform=ax.transAxes)

        # Export plot as image buffer
        buffer = io.BytesIO()
        fig.savefig(buffer, format='png')
        image_bytes = buffer.getvalue()
        buffer.close()

        # return dictionary with image data
        return {
            'image': image_bytes,
            'mime-type': 'image/png'
        }
- Now we need to register our output view provider with the package metadata
so that the Django Portal will be able to discover it. The cookiecutter
template already created this when it generated the
gaussian_eigenvalues_view.py code. We can take a look and make sure it added
an
airavata.output_view_providersentry to the[options.entry_points]section in the$HOME/custom_ui_tutorial_app/setup.cfgfile:
[options.entry_points]
airavata.djangoapp =
    custom_ui_tutorial_app = custom_ui_tutorial_app.apps:CustomUiTutorialAppConfig
airavata.output_view_providers =
    gaussian_eigenvalues_view = custom_ui_tutorial_app.output_views.gaussian_eigenvalues_view:GaussianEigenvaluesViewProvider
gaussian_eigenvalues_view is the output view provider id.
custom_ui_tutorial_app.output_views.gaussian_eigenvalues_view is the module in
which the GaussianEigenvaluesViewProvider output view provider class is found.
- While we're looking at setup.cfg, let's add our output view providers Python
dependencies. Under
install_requiresadd cclib, numpy and matplotlib, so that it looks like:
install_requires =
    django >= 2.2
    airavata-django-portal-sdk
    cclib
    numpy
    matplotlib
- Now we need to install the custom_ui_tutorial_app package into the Django portal's virtual environment.
docker exec -w /extensions custom-ui-tutorial pip install -e .
docker exec custom-ui-tutorial touch /code/django_airavata/wsgi.py
These commands:
- install our custom django app package and its dependencies into the container's Python environment, and
- touches the wsgi.py to trigger a reload of the Django portal dev server.
(tutorial-env) PS C:\Users\username\airavata-django-portal> cd $HOME\custom_ui_tutorial_app
(tutorial-env) PS C:\Users\username\custom_ui_tutorial_app> pip install -e .
(tutorial-env) PS C:\Users\username\custom_ui_tutorial_app> cd ..\airavata-django-portal
(tutorial-env) PS C:\Users\username\airavata-django-portal> python manage.py runserver
(tutorial-env) $ cd $HOME/custom_ui_tutorial_app
(tutorial-env) $ pip install -e .
(tutorial-env) $ cd ../airavata-django-portal
(tutorial-env) $ python manage.py runserver
Use the GaussianEigenvaluesViewProvider with the Gaussian log output file
Back in the Django Portal, we'll make sure the application interface for Gaussian is configured to add the GaussianEigenvaluesViewProvider as an additional output view of the file.
- Log into your local Django Portal instance at http://localhost:8000.
- In the menu at the top, select Settings.
- Click on the Gaussian16 application.
- Click on the Interface tab.
- Scroll down to the Output Field: Gaussian-Application-Output.
- Verify that the following is in the Metadata section:
{
    "output-view-providers": ["gaussian_eigenvalues_view"]
}
It should look something like this:

- Go back to the Workspace using the menu at the top.
- Select your Gaussian16 experiment from the right sidebar.
- For the .log output file there should be a dropdown menu allowing you to select an alternate view. Select Gaussian Eigenvalues. Now you should see the image generated by the custom output view provider.
(Optional) Interactive parameter
In additional to producing static visualizations, output view providers can declare interactive parameters that can be manipulated by the user. We can add a simple boolean interactive parameter to toggle the display of the matplotlib grid as an example.
- Open
$HOME/custom_ui_tutorial_app/custom_ui_tutorial_app/output_views/gaussian_eigenvalues_view.py. Change thegenerate_datafunction so that it has an additionalshow_gridparameter with a default value ofFalse:
def generate_data(self, request, experiment_output, experiment, output_file=None, show_grid=False, **kwargs):
- Add the following
.grid()lines to the matplotlib code:
...
            fig.suptitle("Eigenvalues")
            ax = fig.subplots(2, 1)
            ax[0].plot(range(1, 10), homo_eigenvalues, label='Homo')
            ax[0].set_ylabel('eV')
            ax[0].legend()
            ax[0].grid(show_grid)
            ax[1].plot(range(1, 10), lumo_eigenvalues, label='Lumo')
            ax[1].set_ylabel('eV')
            ax[1].legend()
            ax[1].grid(show_grid)
...
- Change the resulting dictionary to have the special
interactiveproperty and declare theshow_gridparameter:
...
        # return dictionary with image data
        return {
            'image': image_bytes,
            'mime-type': 'image/png'
            'interactive': [
                {'name': 'show_grid', 'value': show_grid}
            ]
        }
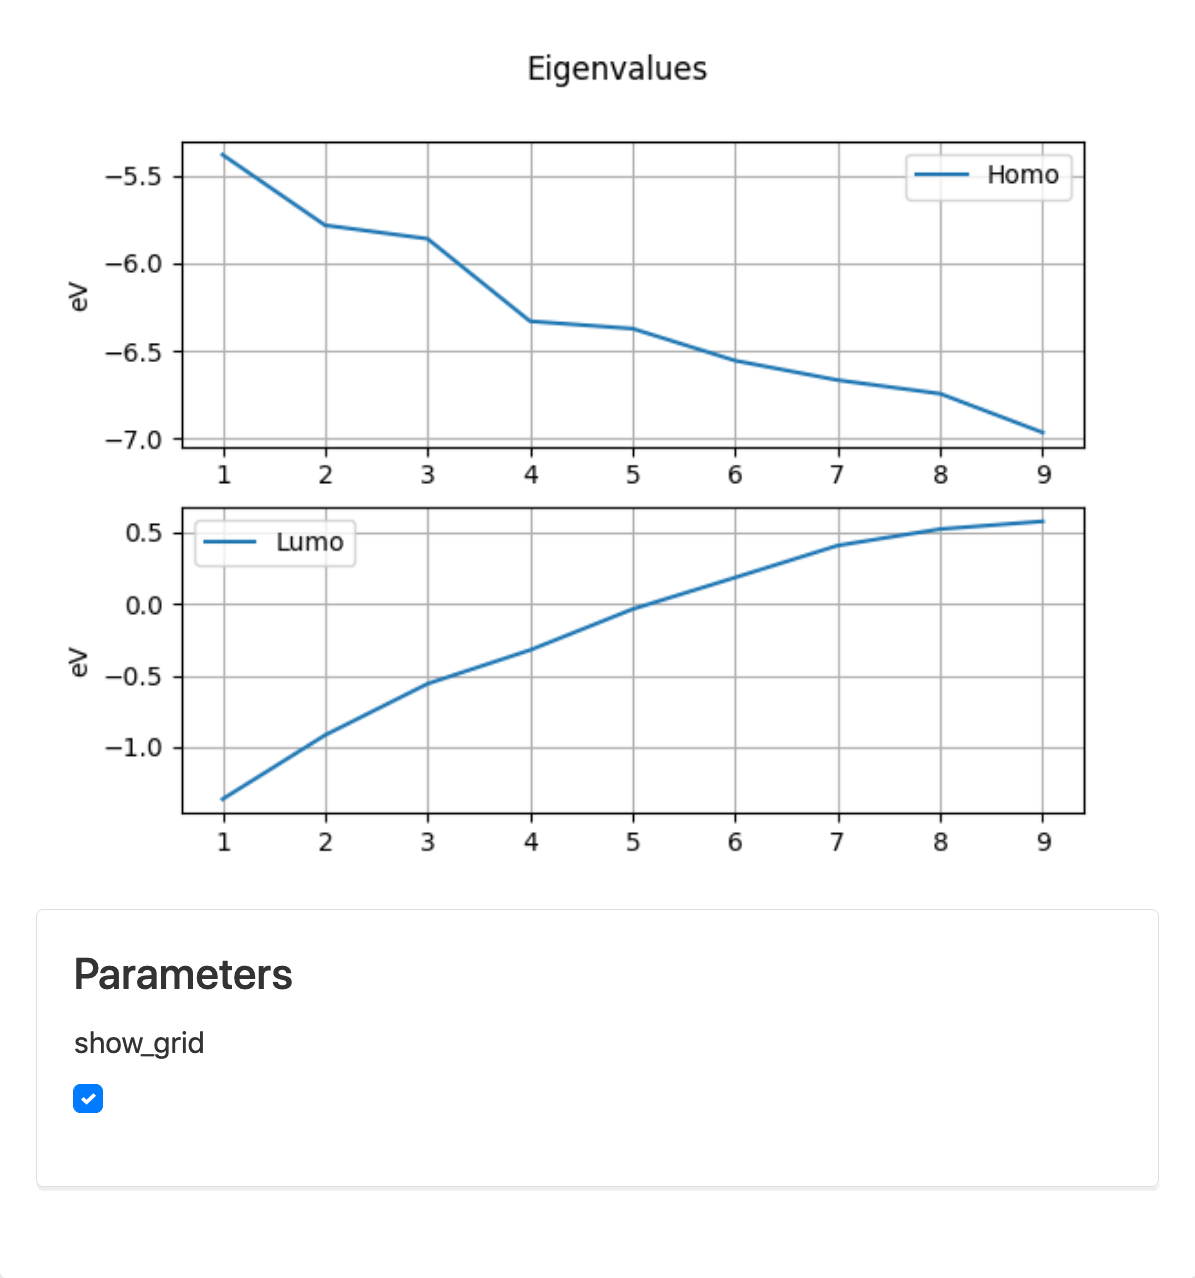
This will provider the user with a checkbox for manipulating the show_grid parameter. Every time the user changes it, the GaussianEigenvaluesViewProvider will be again invoked. It should look something like the following:
There are several more interactive parameter types and additional options. You can learn more about them in the custom output view provider documentation.
Tutorial exercise: Create a custom Django app
In this tutorial exercise we'll create a fully custom user interface that lives within the Django Portal.
What we're going to build is a very simple user interface that will:
- allow a user to pick a greeting in one of several languages
- submit a simple echo job to a batch scheduler to echo that greeting
- display the echoed greeting by displaying the STDOUT file produced by the job
This is an intentionally simple example to demonstrate the general principle of using custom REST APIs and UI to setup, execute and post-process/visualize the output of a computational experiment.
We've already registered the Echo application with the portal, meaning we registered its interface and on which compute resource it is deployed.
A Django application or app is a Python package that may include Django views, url mappings, models, etc. It's a way of creating a kind of plug-in that integrates with a Django server. We'll create this custom user interface by developing a Django app that uses the Django framework as well as the Airavata Django Portal REST APIs and JS library.
Setting up the Django app
To start, we'll just create a simple "Hello World" page for the Django app and get it properly registered with the local Django Portal instance.
-
In the
custom_ui_tutorial_appdirectory, open$HOME/custom_ui_tutorial_app/custom_ui_tutorial_app/templates/custom_ui_tutorial_app/home.html. Copy this file tohello.htmlin the same directory. -
Change the title of the page, in the
<h1>tag, to Hello World and save the file.
{% extends 'base.html' %}

{% block content %}
<div class="main-content-wrapper">
    <main class="main-content">
        <div class="container-fluid">
            <h1>Hello World</h1>
        </div>
    </main>
</div>
{% endblock content %}
- Open the file
$HOME/custom_ui_tutorial_app/custom_ui_tutorial_app/views.pyand add the followinghello_worldview function at the end of the file:
@login_required
def hello_world(request):
    return render(request, "custom_ui_tutorial_app/hello.html")
This view will simply display the template created in the previous step.
- Open the file
$HOME/custom_ui_tutorial_app/custom_ui_tutorial_app/urls.pyand add a URL mapping for ofhello/to thehello_worldview function:
from django.urls import path

from . import views

app_name = 'custom_ui_tutorial_app' urlpatterns = [ path('home/', views.home,
name='home'), path('hello/', views.hello_world, name='hello_world'), ]
This maps the /hello/ URL to the hello_world view.
- Open the file
$HOME/custom_ui_tutorial_app/custom_ui_tutorial_app/apps.pyand update thefa_icon_classattribute and theurl_homeattribute to theCustomUiTutorialAppConfigclass:
from django.apps import AppConfig

class CustomUiTutorialAppConfig(AppConfig): name = 'custom_ui_tutorial_app'
label = name verbose_name = "Custom UI Tutorial App" fa_icon_class =
"fa-comment" url_home = "custom_ui_tutorial_app:hello_world"
This the main metadata for this custom Django app. Besides the normal metadata
that the Django framework expects, this also defines a display name
(verbose_name) and an icon (fa_icon_class) to use for this custom app. The
url_home attribute specifies the initial view that should be rendered when
navigating to this app.
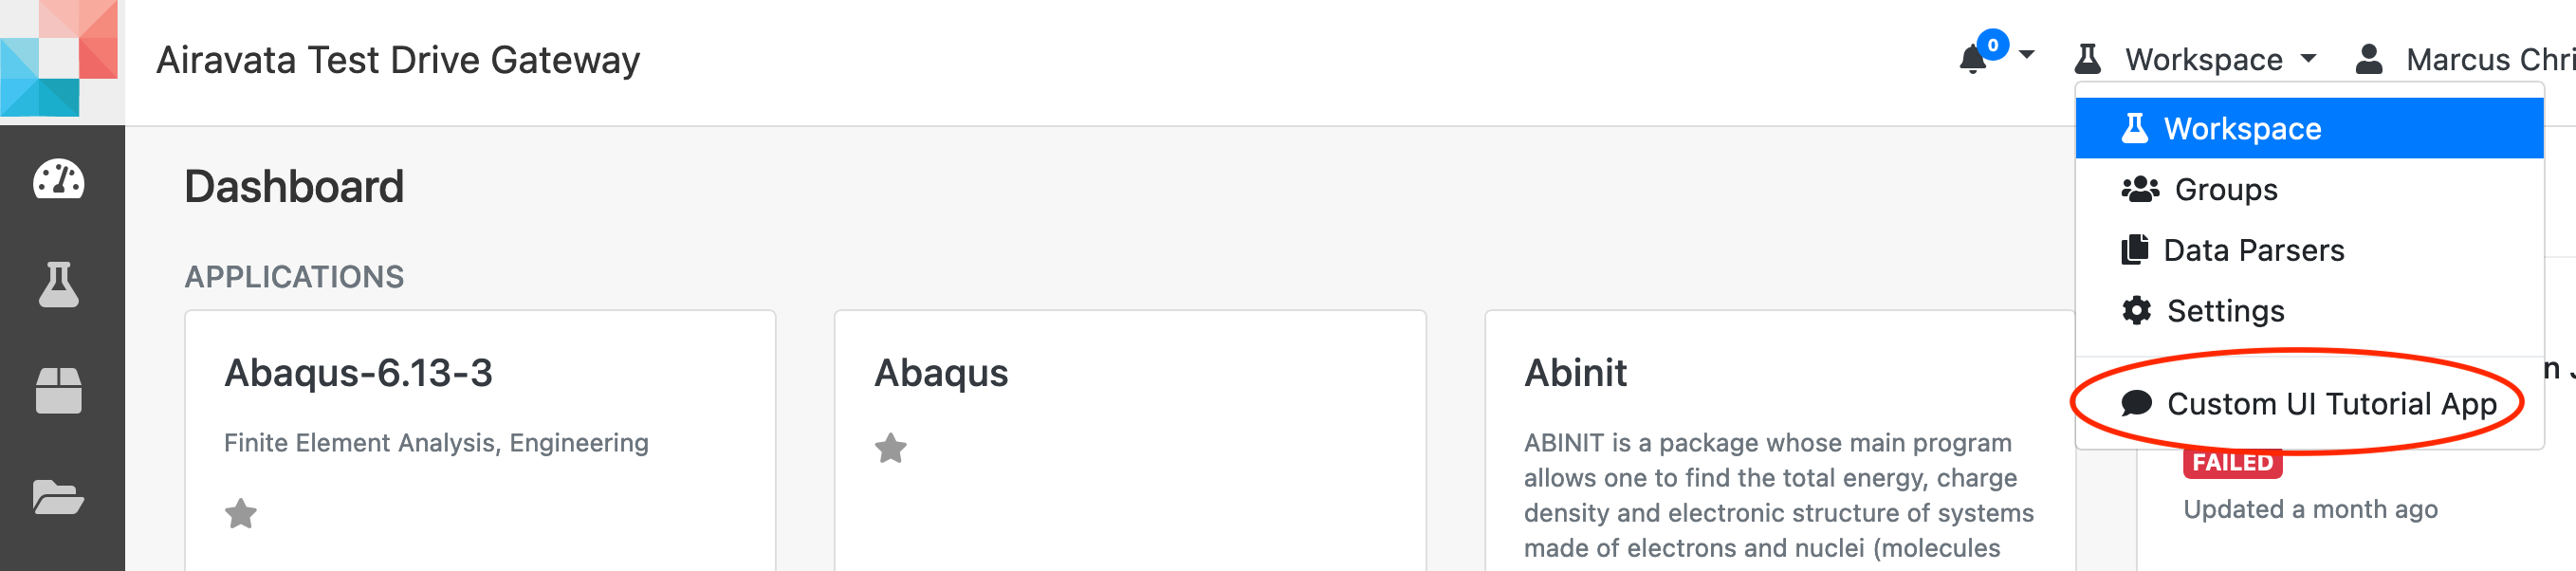
Now you should be able to log into the portal locally and see Custom UI Tutorial App in the drop down menu in the header (click on Workspace then you should see it in that menu).
Adding a list of "Hello" greetings
Now we'll create a REST endpoint in our custom Django app that will return greetings in several languages.
- In the
$HOME/custom_ui_tutorial_app/custom_ui_tutorial_app/views.pyfile, we add the following imports:
from django.http import JsonResponse
from rest_framework.decorators import api_view
- Also we add the following view:
@api_view()
def languages(request):
    return JsonResponse({'languages': [{
        'lang': 'French',
        'greeting': 'bonjour',
    }, {
        'lang': 'German',
        'greeting': 'guten tag'
    }, {
        'lang': 'Hindi',
        'greeting': 'namaste'
    }, {
        'lang': 'Japanese',
        'greeting': 'konnichiwa'
    }, {
        'lang': 'Swahili',
        'greeting': 'jambo'
    }, {
        'lang': 'Turkish',
        'greeting': 'merhaba'
    }]})
- In
$HOME/custom_ui_tutorial_app/custom_ui_tutorial_app/urls.pywe add a url mapping for thelanguagesview:
from django.urls import path

from . import views

app_name = 'custom_ui_tutorial_app' urlpatterns = [ path('home/', views.home,
name='home'), path('hello/', views.hello_world, name="hello_world"),
path('languages/', views.languages, name="languages"), ]
- In
$HOME/custom_ui_tutorial_app/custom_ui_tutorial_app/templates/custom_ui_tutorial_app/hello.html, add the lines between the STARTING HERE and ENDING HERE comments. This adds a<select>element to the template which will be used to display the greeting options:
...
<div class="main-content-wrapper">
    <main class="main-content">
        <div class="container-fluid">
            <h1>Hello World</h1>

            <!-- STARTING HERE -->
            <div class="card">
                <div class="card-header">
                    Run "echo" for different languages
                </div>
                <div class="card-body">
                    <select id="greeting-select"></select>
                    <button id="run-button" class="btn btn-primary">Run</button>
                </div>
            </div>
            <!-- ENDING HERE -->
        </div>
    </main>
</div>
...
<div class="card">
    <div class="card-header">Run "echo" for different languages</div>
    <div class="card-body">
        <select id="greeting-select"></select>
        <button id="run-button" class="btn btn-primary">Run</button>
    </div>
</div>
-
The
hello.htmltemplate already has the{% load static %}directive and ascriptsblock at the end. This will load the AiravataAPI JavaScript library which has utilities for interacting with the Django portal's REST API (which can also be used for custom developed REST endpoints) and model classes for Airavata's data models. Theutils.FetchUtilsis used to load the languages REST endpoint.Add to
hello.htmlthe code between the STARTING HERE and ENDING HERE comments.
{% block scripts %}
<script src="{% static 'django_airavata_api/dist/airavata-api.js' %}"></script>
<script>
    const { models, services, session, utils } = AiravataAPI;

    // STARTING HERE
    utils.FetchUtils.get("/custom_ui_tutorial_app/languages/").then((data) => {
        data.languages.forEach((language) => {
            $("#greeting-select").append(
                `<option value="${language.greeting}">
                    ${language.lang} - "${language.greeting}"
                 </option>`
            );
        });
    });
    // ENDING HERE
</script>
{% endblock scripts %}
utils.FetchUtils.get("/custom_ui_tutorial_app/languages/").then((data) => {
    data.languages.forEach((language) => {
        $("#greeting-select").append(
            `<option value="${language.greeting}">
                ${language.lang} - "${language.greeting}"
             </option>`
        );
    });
});
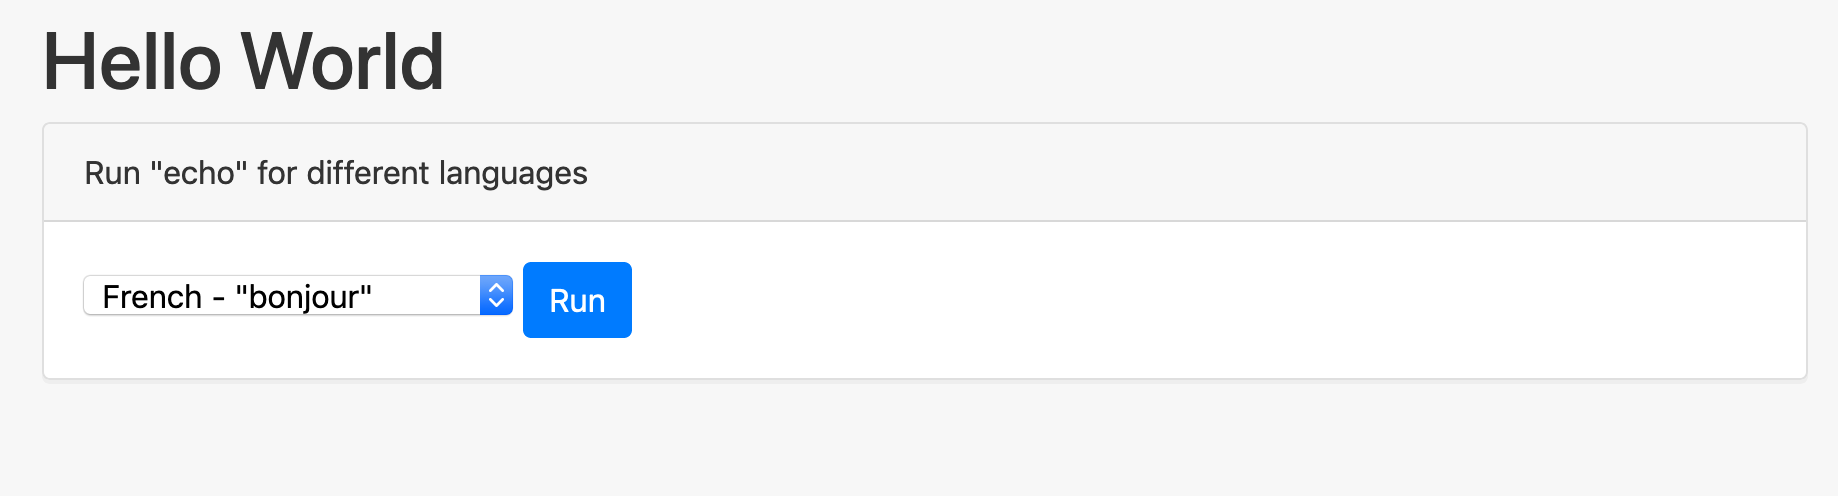
Now when you view the custom app at http://localhost:8000/custom_ui_tutorial_app/hello/ you should see a dropdown of greetings in several languages, like so:
Displaying a list of recent experiments
Now we'll use the AiravataAPI library to load the user's recent experiments.
- In
$HOME/custom_ui_tutorial_app/custom_ui_tutorial_app/templates/custom_ui_tutorial_app/hello.html, add the following lines between the STARTING HERE and ENDING HERE comments. This adds table to display recent experiments to the bottom ofhello.html:
...
            <div class="card">
                <div class="card-header">
                    Run "echo" for different languages
                </div>
                <div class="card-body">
                    <select id="greeting-select"></select>
                    <button id="run-button" class="btn btn-primary">Run</button>
                </div>
            </div>

            <!-- STARTING HERE -->
            <div class="card">
                <div class="card-header">
                    Experiments
                </div>
                <div class="card-body">
                    <button id="refresh-button" class="btn btn-secondary">Refresh</button>
                    <table class="table">
                        <thead>
                            <tr>
                                <th scope="col">Name</th>
                                <th scope="col">Application</th>
                                <th scope="col">Creation Time</th>
                                <th scope="col">Status</th>
                                <th scope="col">Output</th>
                            </tr>
                        </thead>
                        <tbody id="experiment-list">
                        </tbody>
                    </table>
                </div>
            </div>
            <!-- ENDING HERE -->

        </div>
    </main>
</div>
{% endblock content %}
<div class="card">
    <div class="card-header">Experiments</div>
    <div class="card-body">
        <button id="refresh-button" class="btn btn-secondary">Refresh</button>
        <table class="table">
            <thead>
                <tr>
                    <th scope="col">Name</th>
                    <th scope="col">Application</th>
                    <th scope="col">Creation Time</th>
                    <th scope="col">Status</th>
                    <th scope="col">Output</th>
                </tr>
            </thead>
            <tbody id="experiment-list"></tbody>
        </table>
    </div>
</div>
- Now we'll use the ExperimentSearchService to load the user's most recent 5
Echo experiments and display them in the table. We add the following to the
end of the scripts block in
hello.html:
const appInterfaceId = "Echo_23d67491-1bef-47bd-a0f5-faf069e09773";

async function loadExperiments() {
    const data = await services.ExperimentSearchService.list({
        limit: 5,
        [models.ExperimentSearchFields.USER_NAME.name]:
            session.Session.username,
        [models.ExperimentSearchFields.APPLICATION_ID.name]: appInterfaceId,
    });

    $("#experiment-list").empty();
    data.results.forEach(async (expSummary, index) => {
        $("#experiment-list").append(
            `<tr>
                <td>${expSummary.name}</td>
                <td>${expSummary.executionId}</td>
                <td>${expSummary.creationTime}</td>
                <td>${expSummary.experimentStatus.name}</td>
                <td id="output_${index}"></td>
            </tr>`
        );
    });
}

loadExperiments();
$("#refresh-button").click(loadExperiments);
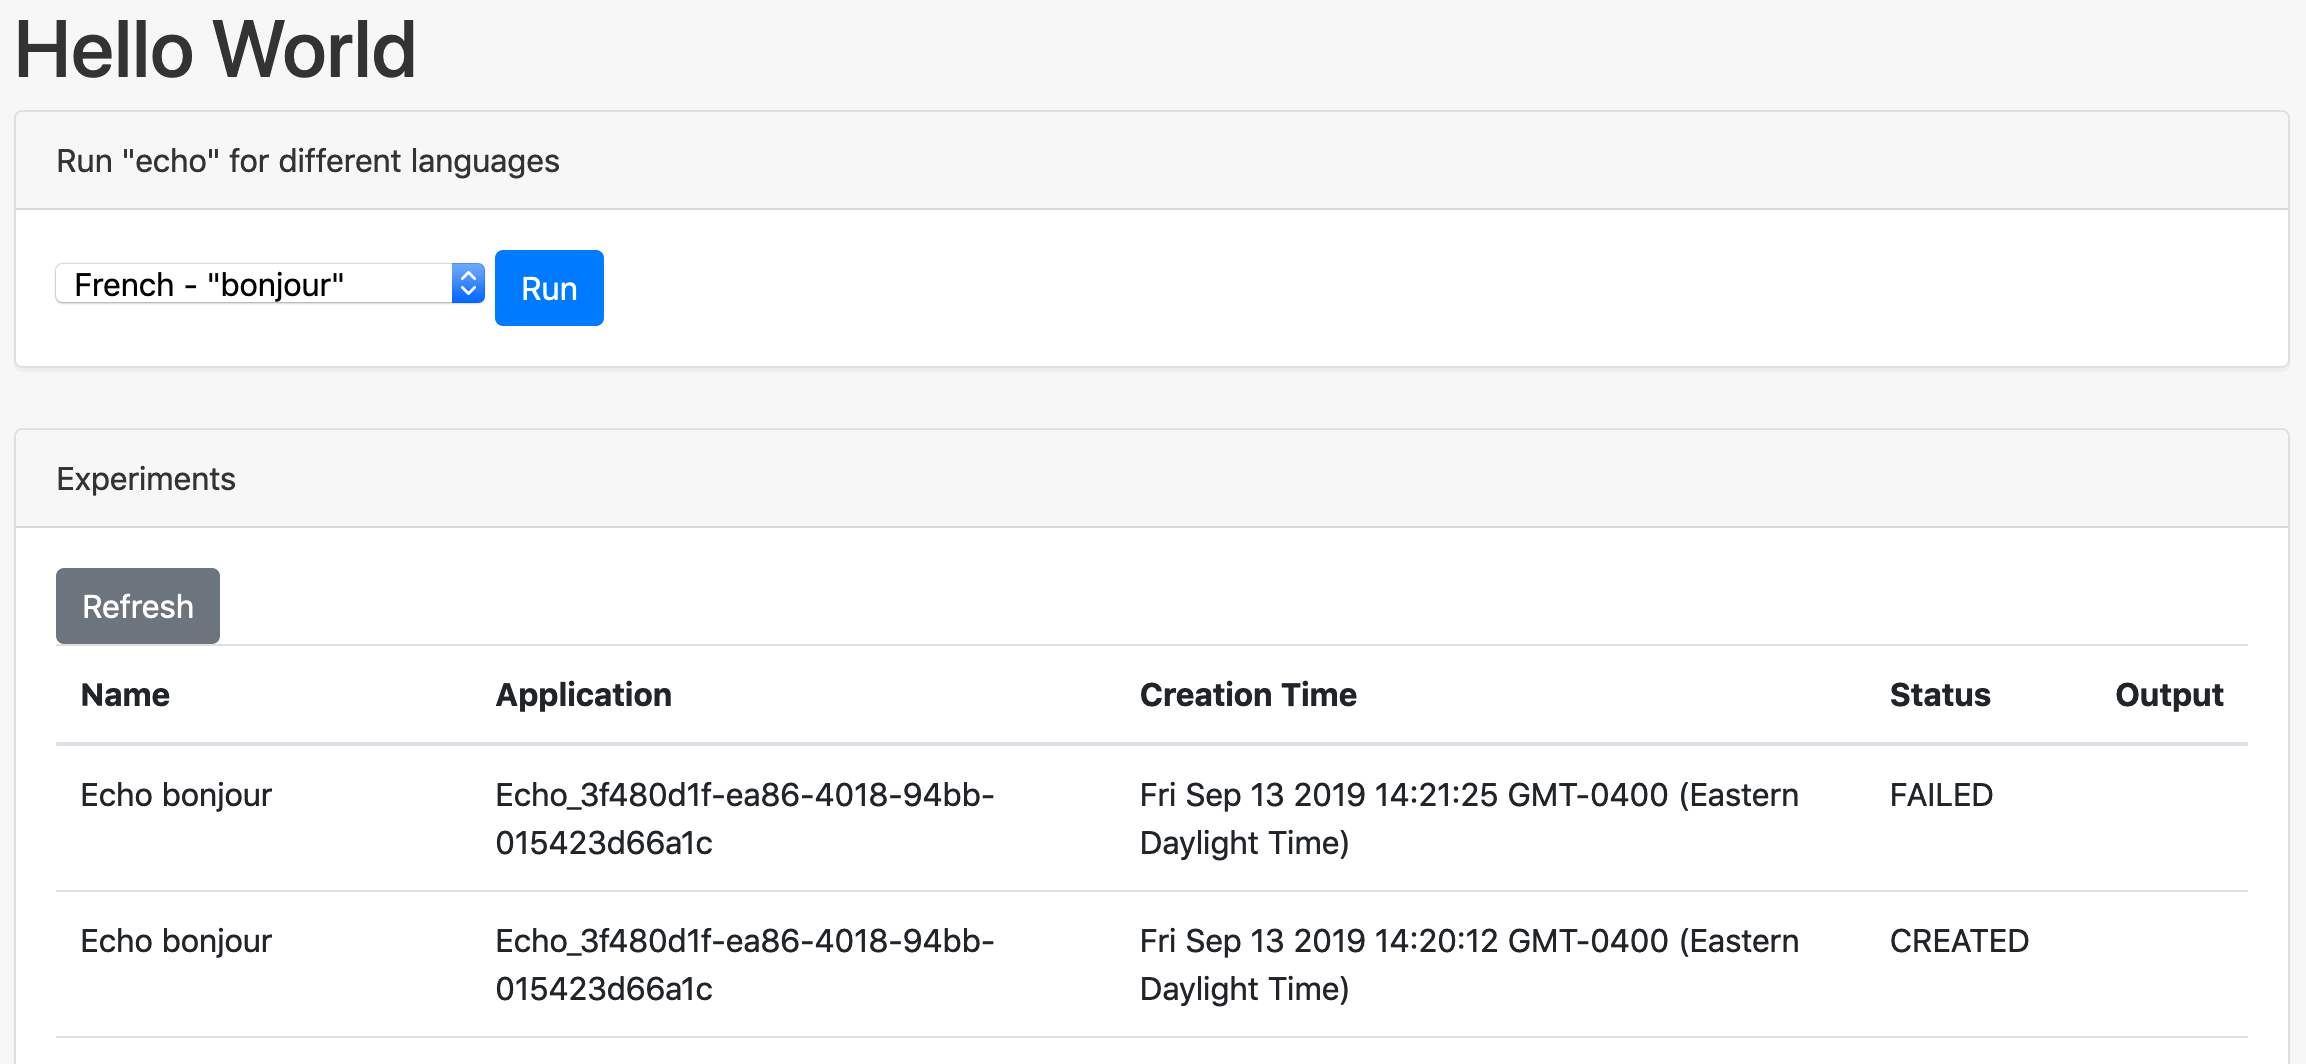
The user interface should now look something like:
Submitting an Echo job
Now we'll use AiravataAPI to submit an Echo job. First we'll add the code and
then examine it line by line to see what it is doing.
- Add the following to the end of the scripts block in
hello.html:
async function submitExperiment(greeting) {
    // Construct experiment object
    const experimentData = await utils.ExperimentUtils.createExperiment({
        applicationInterfaceId: appInterfaceId,
        computeResourceName: "example-vc.jetstream-cloud.org",
        experimentName: "Echo " + greeting,
        experimentInputs: {
            "Input-to-Echo": greeting,
        },
    });
    // Save experiment
    const experiment = await services.ExperimentService.create({
        data: experimentData,
    });
    // Launch experiment
    await services.ExperimentService.launch({
        lookup: experiment.experimentId,
    });
}

async function runClickHandler() {
    const greeting = $("#greeting-select").val();
    await submitExperiment(greeting);
    // Reload experiments to see the new one
    loadExperiments();
}

$("#run-button").click(runClickHandler);
- Going line by line we'll now take a look at this code. We added a click handler to the Run button that gets the selected greeting value:
async function runClickHandler() {
    const greeting = $("#greeting-select").val();
    await submitExperiment(greeting);
    // Reload experiments to see the new one
    loadExperiments();
}

$("#run-button").click(runClickHandler);
-
Next, the
submitExperimentfunction is called. This code constructs an experiment object using the utility functionutils.ExperimentUtils.createExperiment. In Airavata, Experiments are created from Application Interface descriptions, so we'll first pass theapplicationInterfaceId. We already have theappInterfaceIdin the code because we used this to retrieve experiment results for the Echo application.You might wonder, how would I find this ID if I wanted to look one up for an application? For this you can use the REST API and programmatically look up these values in your code. Also, the Airavata Django Portal has a browseable REST API and we'll take a look at that now.
If you go to https://testdrive.airavata.org/api/applications/ (make sure you are logged in first) you'll see the Application Module List. For each entry you can click on the URL for the
applicationInterfaceand get the REST API response for the application interface. For example, if you click on the applicationInterface link for the Echo application module, https://testdrive.airavata.org/api/applications/Echo_37eb38ac-74c8-4aa4-a037-c656ab5bc6b8/application_interface/, you'll then get a response that shows that the applicationInterfaceId isEcho_23d67491-1bef-47bd-a0f5-faf069e09773.The other parameters to the
createExperimentfunction are thecomputeResourceNameof the cluster to which we want to submit as well as the name of the experiment and the experiment's input values.
// Construct experiment object
const experimentData = await utils.ExperimentUtils.createExperiment({
    applicationInterfaceId: appInterfaceId,
    computeResourceName: "example-vc.jetstream-cloud.org",
    experimentName: "Echo " + greeting,
    experimentInputs: {
        "Input-to-Echo": greeting,
    },
});
-
The
utils.ExperimentUtils.createExperimentfunction does a few more things behind the scenes and once we run it we can take a look at the REST API calls it makes. In summaryutils.ExperimentUtils.createExperiment:- loads the Application Interface
- loads the compute resource ID
- finds a Group Resource Profile that can be used to submit the job to the given compute resource
- finds the Application Deployment for the application on the given compute resource
- loads the default queue settings for that Application Deployment and uses them when constructing the Experiment
- loads the user's most recently used Project and uses it when constructing the Experiment
- creates an Experiment instance from the Application Interface and populates its fields
-
Now that the experiment object is created, we can save it (
ExperimentService.create) and then launch it (ExperimentService.launch).
// ...
// Save experiment
const experiment = await services.ExperimentService.create({
    data: experimentData,
});
// Launch experiment
await services.ExperimentService.launch({ lookup: experiment.experimentId });
Now that we can launch the experiment we can go ahead and give it a try.
You can also try this out in the production deployment at https://testdrive.airavata.org/custom_ui_tutorial_app/hello/.
Displaying the experiment output
Instead of simply reporting the status of the job we would also like to do something with the output. The STDOUT of the Echo job has a format like the following:
bonjour
We'll read the STDOUT file and display that in our experiment listing table.
- What we need to do is get the identifier for the experiment's STDOUT file. In
Airavata, this identifier is called the Data Product ID. The experiment
metadata includes a list of output files and the
valueof each one is that file's Data Product ID. For eachexpwe can use theExperimentServiceto load this metadata for the experiment, find the STDOUT output object and get its value, which is the Data Product ID.
if (exp.experimentStatus === models.ExperimentState.COMPLETED) {
    const experiment = await services.ExperimentService.retrieve({
        lookup: expSummary.experimentId,
    });
    const stdoutInput = experiment.getExperimentOutput("Echo-STDOUT");
    const dataProductURI = stdoutInput.value;
}
- Then we'll simply download the file and display the value in the table. We'll
use
ExperimentUtils.readDataProduct()to download the file.
if (expSummary.experimentStatus === models.ExperimentState.COMPLETED) {
    const experiment = await services.ExperimentService.retrieve({
        lookup: expSummary.experimentId,
    });
    const stdoutInput = experiment.getExperimentOutput("Echo-STDOUT");
    const dataProductURI = stdoutInput.value;
    try {
        const stdout = await utils.ExperimentUtils.readDataProduct(
            dataProductURI
        );
        $(`#output_${index}`).text(stdout);
    } catch (error) {
        $(`#output_${index}`).text("N/A");
    }
}
- To enable this, add the lines between the STARTING HERE and ENDING
HERE comments to the
loadExperimentsfunction. Here's the update to theloadExperimentsfunction:
async function loadExperiments() {
    const data = await services.ExperimentSearchService.list({
        limit: 5,
        [models.ExperimentSearchFields.USER_NAME.name]:
            session.Session.username,
        [models.ExperimentSearchFields.APPLICATION_ID.name]: appInterfaceId,
    });

    $("#experiment-list").empty();
    data.results.forEach(async (expSummary, index) => {
        $("#experiment-list").append(
            `<tr>
                <td>${expSummary.name}</td>
                <td>${expSummary.executionId}</td>
                <td>${expSummary.creationTime}</td>
                <td>${expSummary.experimentStatus.name}</td>
                <td id="output_${index}"></td>
            </tr>`
        );

        // STARTING HERE
        // If experiment has finished, download and display the stdout file contents
        if (expSummary.experimentStatus === models.ExperimentState.COMPLETED) {
            const experiment = await services.ExperimentService.retrieve({
                lookup: expSummary.experimentId,
            });
            const stdoutInput = experiment.getExperimentOutput("Echo-STDOUT");
            const dataProductURI = stdoutInput.value;
            try {
                const stdout = await utils.ExperimentUtils.readDataProduct(
                    dataProductURI
                );
                // if stdout is null, it means the file wasn't found
                if (stdout !== null) {
                    $(`#output_${index}`).text(stdout);
                } else {
                    $(`#output_${index}`).text("N/A");
                }
            } catch (error) {
                $(`#output_${index}`).text("N/A");
            }
        }
        // ENDING HERE
    });
}
// If experiment has finished, download and display the stdout file contents
if (expSummary.experimentStatus === models.ExperimentState.COMPLETED) {
    const experiment = await services.ExperimentService.retrieve({
        lookup: expSummary.experimentId,
    });
    const stdoutInput = experiment.getExperimentOutput("Echo-STDOUT");
    const dataProductURI = stdoutInput.value;
    try {
        const stdout = await utils.ExperimentUtils.readDataProduct(
            dataProductURI
        );
        // if stdout is null, it means the file wasn't found
        if (stdout !== null) {
            $(`#output_${index}`).text(stdout);
        } else {
            $(`#output_${index}`).text("N/A");
        }
    } catch (error) {
        $(`#output_${index}`).text("N/A");
    }
}
Resources
You can browser the final version of the code at https://github.com/machristie/custom_ui_tutorial_app.
Airavata API
The Django portal provides a REST API bridge to the backend Airavata API. So it's helpful to look at what is available in the backend Airavata API. See the Apache Airavata API docs
To see what is in the AiravataAPI JavaScript library, take a look at it's
index.js
file in the
airavata-django-portal repo.
Airavata Gateway Hosting
SciGaP provides free Airavata Gateways hosting services. Log in or create an account at scigap.org to request gateway hosting.